
By now you all know I’m a big fan of transferring graphics to furniture and decor. I’ve tried a few different methods for transferring images onto fabric, but was always pretty underwhelmed with the results. I recently tried a new method for transferring images onto fabric and it’s by far the best method I’ve used yet.
This project is part of the Monthly DIY Challenge. Each month I get together with some of my blogging friends and create a unique project based on the same product or theme. This month’s challenge item is a white pillow case. I decided to create a custom throw pillow using a super easy image transfer technique.

_________________________________________________
Supplies used: (some affiliate links are provided for convenience)
- scissors
- pillow case (I used the IKEA Vigdis for this project. I’ve also used the IKEA Gurli with success. If you don’t have an IKEA nearby, you can find a similar pillow cover here.
_________________________________________________
This project literally took me 5 minutes start to finish. It was so easy and I was pleasantly surprised at how well the fabric transfer paper worked. I’m not sure if I’ve just been living under a rock but I’ve never heard of it before. Why didn’t you guys tell me about this stuff?
The image I used is this cute dictionary bee image from Angie at Knick Of Time. (Click here for the free bee image and to access Angie’s entire library of free vintage images.)

I downloaded the image to my computer, then added it to a Microsoft Word document and stretched the image to cover as much of an 8.5 x 11 sheet of paper as possible. (Technically, you don’t have to upload the image to a Word doc before printing it onto the fabric transfer paper. It was just the easiest way I found to get the photo to print at the size I wanted.)
Instructions to do this: Download the image to your computer. Open a new Microsoft Word Doc. Change the document orientation to Landscape. In the top right section of the menu bar, click the icon that says “picture”. Choose “picture from file”. A box will pop up and you’ll need to find the image you just saved in your computer files. When you open the image it will appear in your Word document. Grab a corner of the image and drag it to enlarge it and fill as much of the sheet of paper as possible (you may need to adjust your borders).
You’ll need to reverse the image (also called mirror image) so it prints backward on the paper. Instructions to do this (I’m using a Mac, so your computer may be different): Right click on the image in your Word doc. When the box pops up click “format picture”. Choose “3D Rotation”. There will be 3 boxes marked X, Y, and Z. In box X, change the 0 to 180 and click ok. At this point, your image should be reversed. You may have to adjust your borders again before printing.
Still with me? Good. Now you just need to load the fabric transfer paper into your printer and print it out. It should look like this printed.

Use a pair of scissors to trim off the excess paper around the edge of the image. You’ll also want to preheat your iron and give the pillow cover a quick iron to remove any wrinkles.
Use a ruler to carefully center your image on the pillow cover. Make sure it’s straight and even from both side edges of the pillow. I chose to adhere my image slightly higher (about an inch or two) from the actual center of the pillow. Carefully follow the instructions on the fabric transfer paper package to adhere the image to your pillow cover. Use firm pressure with a hot iron and do not attempt to peel the paper back to check your image. Once you’re finished and the paper has had a few minutes to cool, it will easily peel away from the image.
When you’re done the image is permanent and washable according to the package. (I haven’t washed mine yet but the image looks really well adhered. It honestly looks and feels as if the image is part of the fabric.


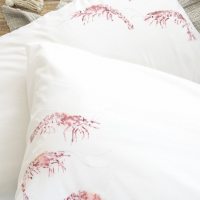
One thing I learned doing this project: Do not choose an image with a large amount of blank space. The blank spaces will not be perfectly invisible on the fabric. The original image I chose was a wreath, and when I did the transfer the blank spaces had a slightly shiny, yellowish tint. Also, because I couldn’t cut the image exactly at the edge there was a weird yellowish halo around the whole thing. It just didn’t look good. So lesson learned..choose an image with a solid background.
Throw pillows can be expensive and I really like that I can use this method to create custom pillow covers that I can put over my existing pillows for holidays and different seasons. The image transfer paper linked above is for white or light colored fabrics. You can also find transfer paper for darker colored fabrics here.
Want to save this for later? Click the red Pinterest icon in the top left corner of the photo.

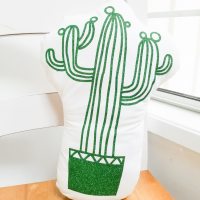
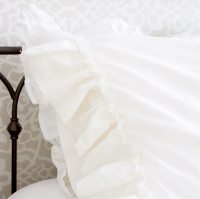
Interested in more unique pillow projects? Check out the photos below to see what the other bloggers came up with. If you’d like to see the full tutorial for any of their projects just click the picture.
      |
Want to hang out more? We do too!
Original article and pictures take i0.wp.com site
Комментариев нет:
Отправить комментарий