Learn how to DIY personalized mugs and tea cups with vinyl – it’s easy to do with professional results! You can make these adorable cups easily with my free cut files and be sipping your favorite drink in no time. Thanks to Tazo Tea for sponsoring this post, which also contains affiliate links that help to support this blog.
Life has been busy lately, and I have been trying to find ways to get everything done (or at least most of it – does anyone ever finish their to-do list??) while maintaining my sanity. It is no easy task, but I have found that adding in little breaks throughout the day to be really helpful.
I mean, we all need a little happy in our day, right? Spending some time playing with my son, doing some stretching, taking a dance break (totally recommend!), or making myself a little cup of tea helps me to find the energy to keep checking items off my list.
Up until the past couple of years, I had never been a big tea drinker, but recently I have discovered that I really love herbal blends, and Tazo’s are some of my favorites. Tazo has a whole collection of fresh and unexpected teas, so there is something for everyone – Zen™, Awake™ English Breakfast, and Passion® are some of the most popular blends.
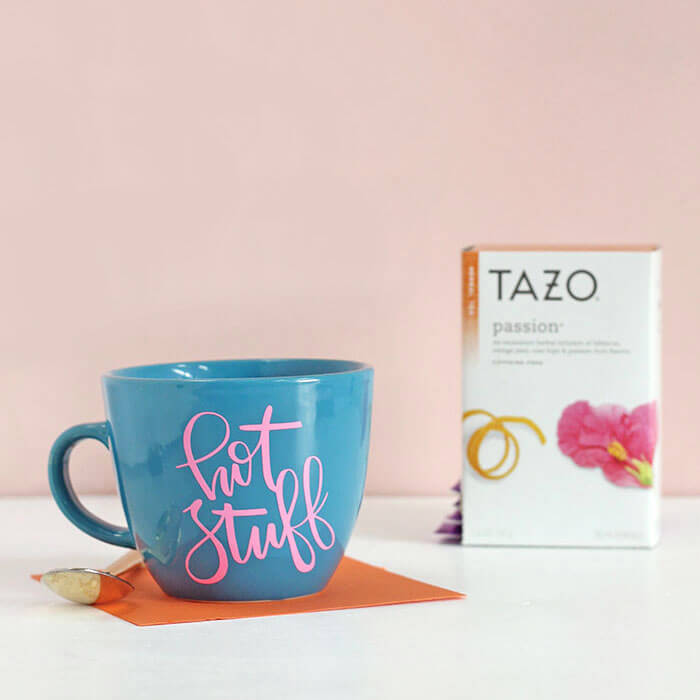
Since herbal teas are my thing, Passion is definitely my favorite. It is a bright, slightly fruity mix of hibiscus, orange peel, rose hips & passion fruit flavors with just a touch of cinnamon, and it is so yummy and happy! And that bright pink color doesn’t hurt. How can you not be happy drinking pink tea?

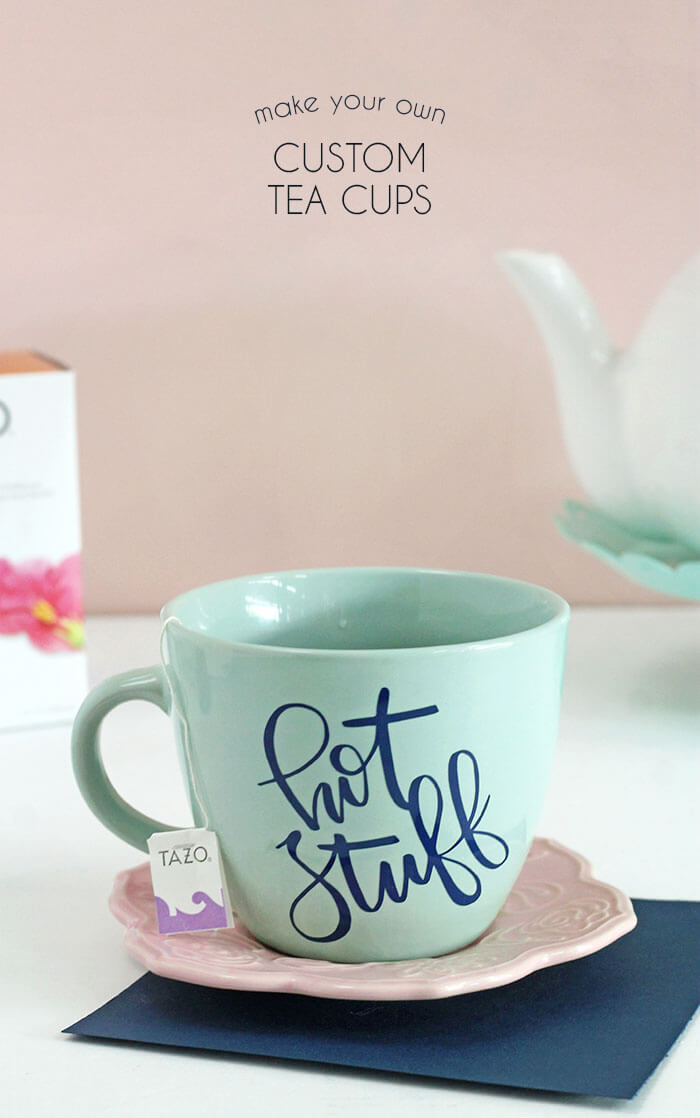
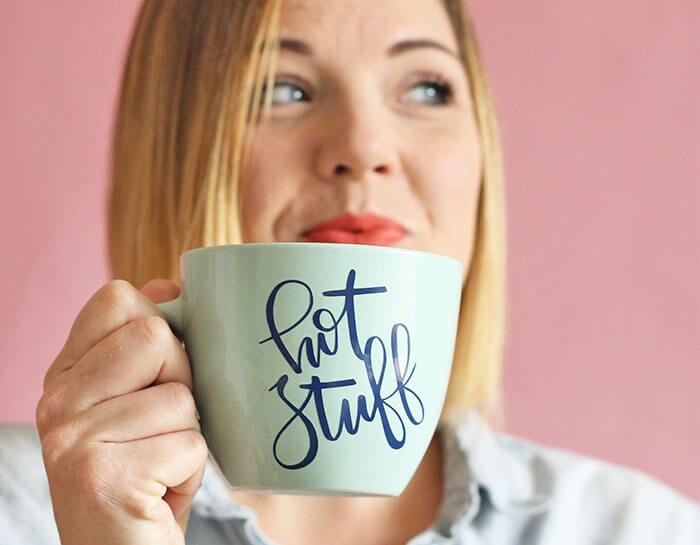
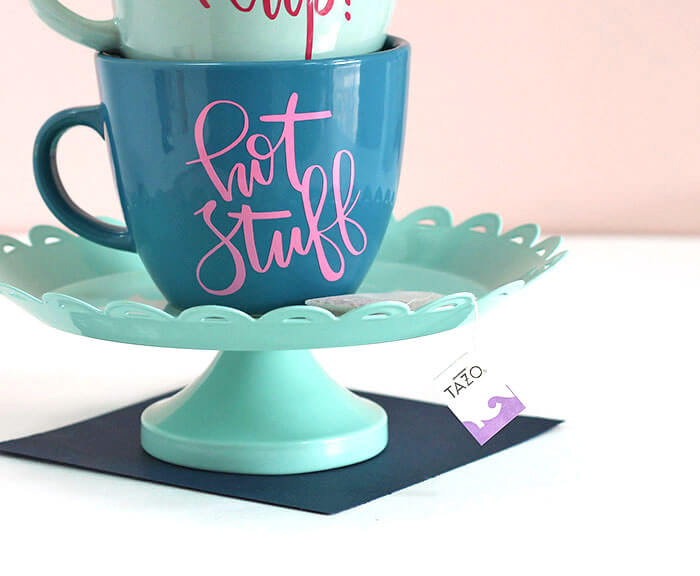
And the only thing to make this whole situation better are some cute DIY personalized mugs, right? I definitely think they up the happy factor. Those little “hot stuff” mugs make me smile every time I see them.
These mugs are easy to make if you have an electronic cutting machine like my Silhouette. Even if you don’t, you can absolutely cut designs from vinyl with scissors or a craft knife and apply it the same way. I will walk you through all the steps to making your own custom, professional-looking mugs. Ready? Let’s do this!
DIY Personalized Mugs and Tea Cups Supplies:
- Blank Mugs (I picked mine up at Target)
- Permanent Adhesive Vinyl (I used Oracal 651)
- Silhouette Cameo (or other electronic cutter)
- Straight Pin
- Applicator Tool (an old credit card works well too)
- My “Hot Stuff” or “Bottoms Up” Designs (Click to download the SVG files)
Of course there are different ways to personalize mugs or tea cups, but I am going with vinyl for this project because it makes it really easy to get professional-looking results. Adhesive vinyl may be a bit intimidating or scary if you haven’t ever used it before, but it really is not that difficult to work with. Just think of it as a sheet of sticker paper! Stickers aren’t scary right? Haha… okay, let’s make some awesome DIY personalized mugs for that awesome tea.
The first step to decorating your cups is to cutting out the design from the vinyl. Download the SVG file of your choice from the supply list above and open it in your software. Then send it to the machine and let it cut for you. If you don’t have a Silhouette, this design might be a bit too complicated to cut by hand, but you can absolutely cut out other designs using scissors or a craft knife.
When your design is done cutting, it’s time to remove the excess vinyl (the stuff around your design that you don’t want transferred to the mug). This process is often referred to as weeding. Because this design is a delicate (some of those lines are a little thin), I decided to do reverse weeding, which makes things a bit easier. Don’t worry! I will walk you through each step!
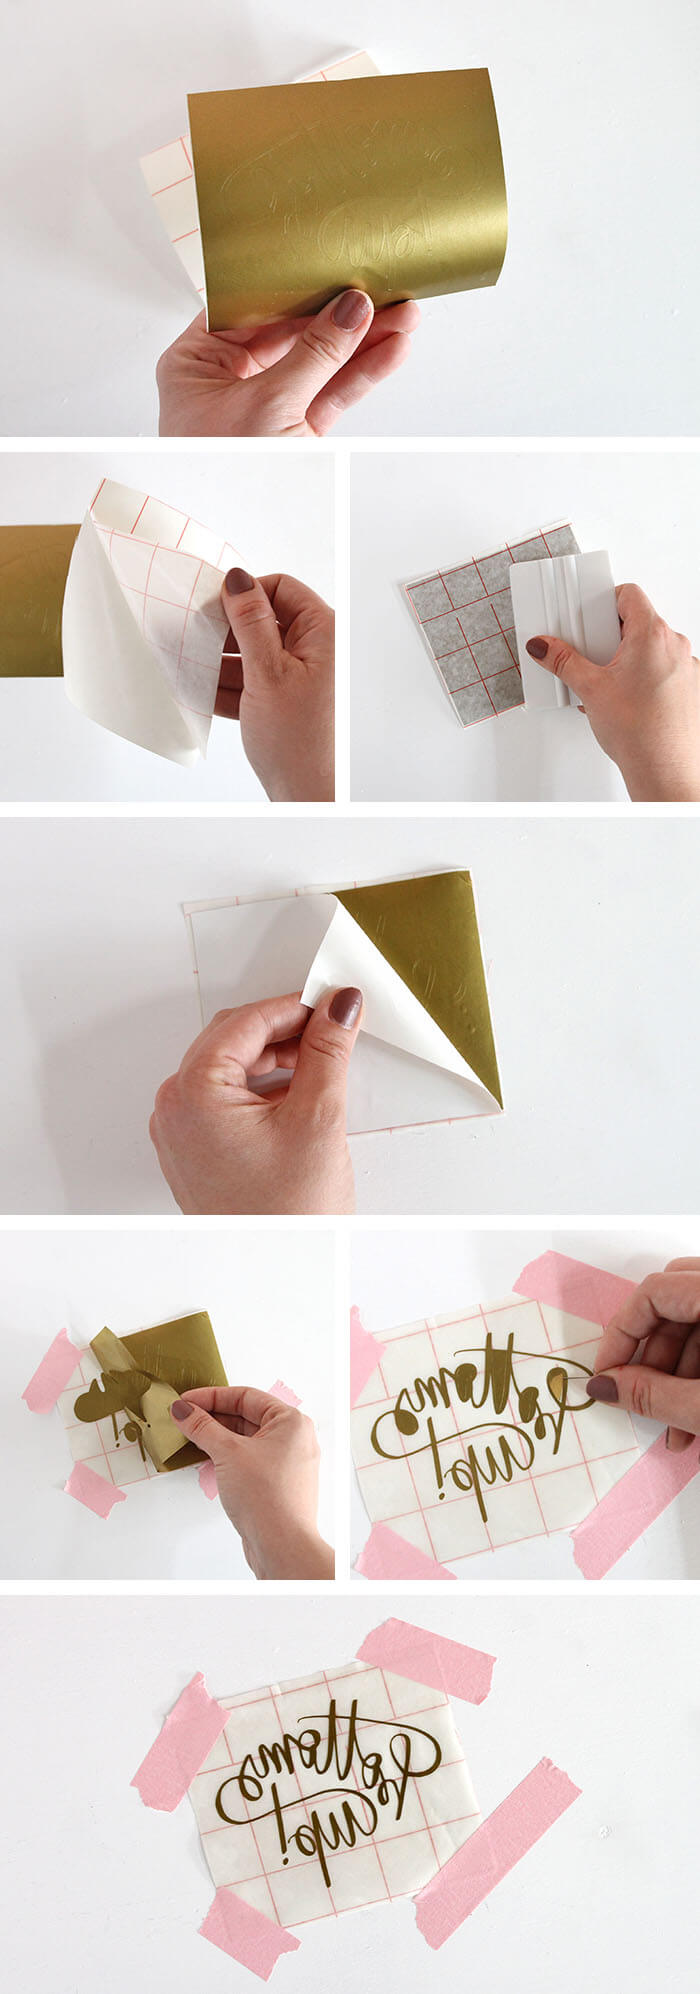
- Start by cutting a piece of transfer tape (clear contact paper also works) slightly bigger than your piece of vinyl.
- Peel the transfer tape from its backing and adhere it to the front of the cut vinyl. Use an application tool or an old credit card to rub the transfer tape onto the vinyl.
- Peel the backing off of the vinyl so the sticky side of the vinyl is facing up. (Keep the backing handy though – we will be using it again!) I find it helpful to use some masking tape to secure the transfer tape to your work surface at this point.
- Carefully peel the excess vinyl up from the transfer tape. Cut away excess vinyl with scissors as you go. Try to avoid letting the excess vinyl stick to your design – that can cause some problems.
- Use you straight pin to pick up the little pieces from inside your letters.
All done with the weeding! Not too bad right? Now we are ready to move that vinyl design over to our cup.
You could just peel up your design at this point and stick it straight on your mug, but it is pretty difficult to get it on straight and wrinkle free that way. Instead, I recommend using the “hinge method,” which has a few more steps but usually gets you a really great application.
Start by putting the vinyl backing back onto your design, shiny side down. This will make it easier to carefully position the design on the mug.
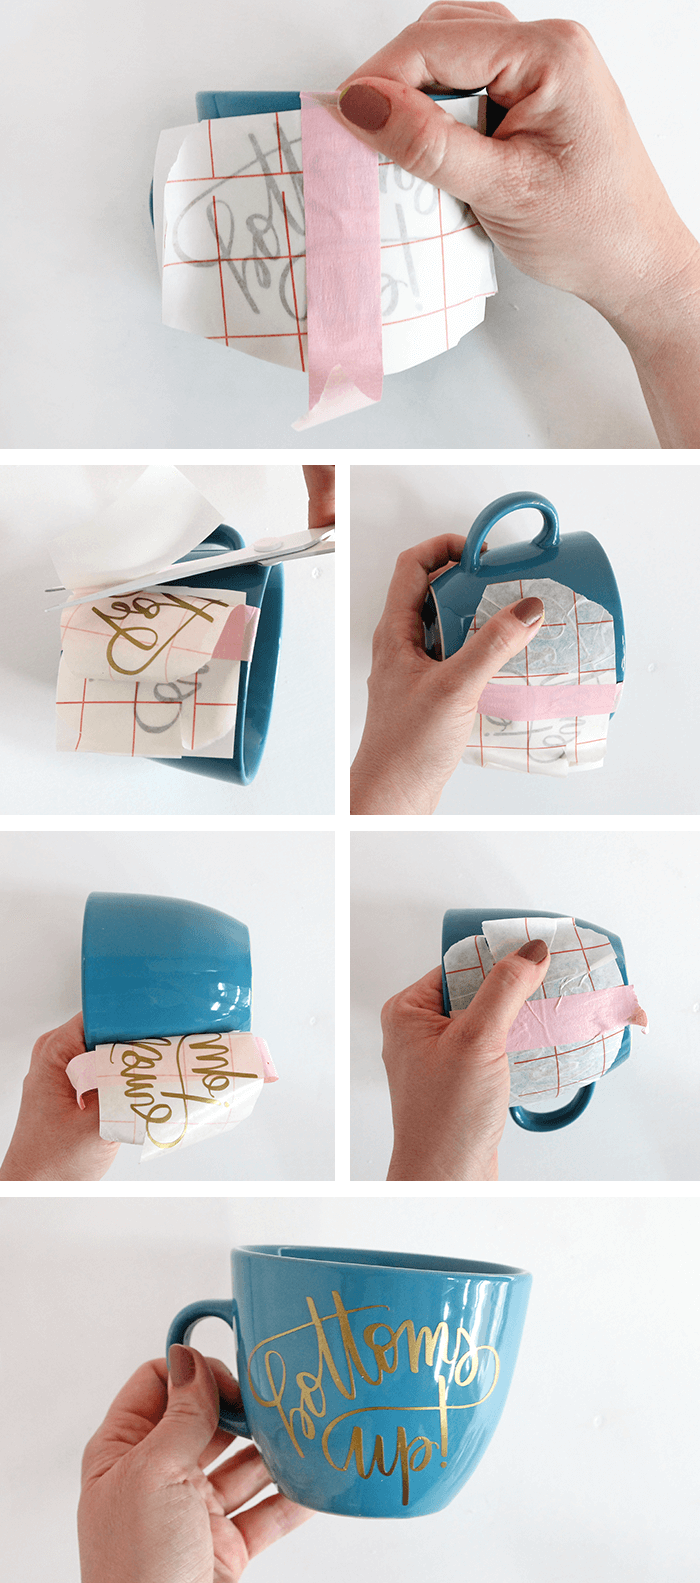
- With your vinyl design sandwiched between the backing and the transfer tape, position your design on your cup. Secure it in place with a strip of masking tape across the middle.
- Peel the design up from the backing to the left of your masking tape (that’s the “hinge”). Cut away the backing with a pair of scissors.
- Use your fingers to smooth the design down onto the mug to the left of your tape hinge. Start from the middle and work outwards. Go slowly to avoid bubbles and wrinkles in the vinyl.
- Peel the backing off of the design on the other side of your hinge.
- Smooth the vinyl on to the mug on the other side using the same method you used before.
- Use your application tool/old credit card to burnish the vinyl onto the mug.
- Peel off the transfer tape. Use your fingers or application tool to smooth out any little bubbles.
Let the adhesive cure for at least 24 hours before washing. I recommend hand washing to keep your cups looking pretty as long as possible.
And that’s it! Your cup is all done! Pretty simple for such a professional look, right?

Finally, fill your cute cup with your favorite Tazo blend, and sip joyfully, hot stuff! You deserve it!

I hope this post has showed you that vinyl projects don’t have to be intimidating! If you want to learn more tips and techniques for working with vinyl, I have a great new resource! My new Craftsy course, Silhouette Saavy: Venture into Vinyl. It’s an online video course that will teach you everything you need to know to make vinyl projects with your Silhouette. We make everything from large wall decals to t-shirts to an etched mirror, and I walk you through each step.

That’s it for today! Happy Making!

Check out more Vinyl Projects here:
Original article and pictures take persialou.com site
Комментариев нет:
Отправить комментарий