We often get asked about using different pompom makers other than Pom Maker for our tutorials. It is possible of course, but there might be some differences and you may get different results. For example, we’re wrapping quite a lot of yarn here to make a dense pompom as Pom Maker can take a very thick layer of wraps, but you may not be able to wrap the same amount with other pompom makers. Other pompom makers may be limited to less wraps, or burst when you come to cutting if you wrap too much.
Also with Pom Maker, you can wrap each half freely with different designs, so we’ll be wrapping the face side of the panda first, and then the back side to follow as a separate part (or you can wrap each part together with a friend). This may not be doable with other makers.
It’s also possible that you’ll need to trim a lot more with other makers than you’ll be doing with Pom Maker.
The wrap counts, the final pompom size and density, how much you need to trim will vary. So take this tutorial as a guide, but know your tool : )
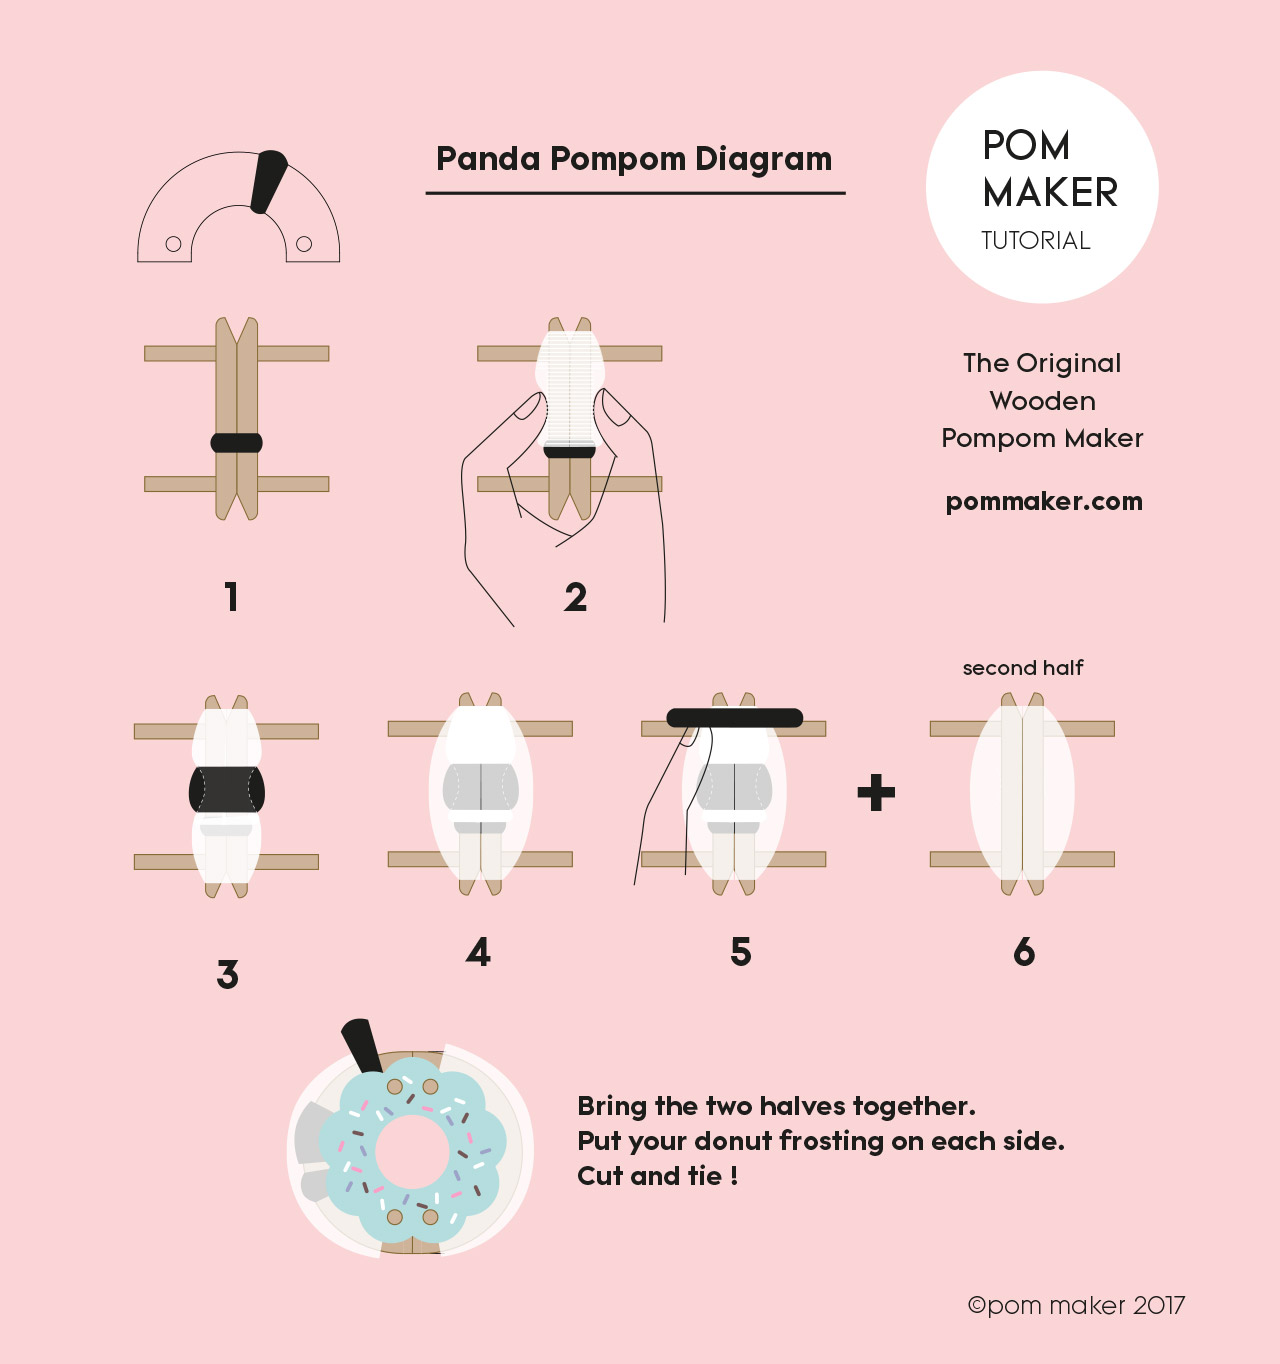
Here’s a cool visual summary of the panda pompom. It shows you the areas you’ll be wrapping in each step below, so come back to this diagram for help if it’s mentioned in a step.

STEP 1 - Nose
Wrap 10 counts of black right in the middle, but slightly off-center of your Pom Maker, so the nose is a little bit below the center of the face. Wrap the layers close together and on top of each other. Imagine a small circle as you do it.

STEP 2

STEP 3 - eyes
The big black patches around the eyes are what makes panda a panda! Fill in the hollow area where your finger tips were with black yarn, making a little bulging shape. See the diagram.
Wrapping 20 – 25 counts is a good guide. More yarn will make bigger eye areas. Baby pandas have smaller patches and more grown up ones have larger.

Now fill the rest of the face with white yarn. Wrap until the eye area is covered under a few layers of white and everywhere else has a similar amount of yarn filled in all over.
Important note here:
As you cover the eyes, you need to remember which end is the top of the head with the eyes, so we can add the ears to the correct end of the head in the next step.
Pay very close attention, or better, tie a little yarn (or anything handy) to that end of the Pom Maker so you can tell easily which end is which even when everything’s covered in white.

STEP 5 - ears


Bring the two halves together and get your frosting on!
Cut all the way around through the middle. Your panda design will now be revealed! : )
Use strong thread or yarn and tie your pompom very tight. As you can see in the video, I made a couple of loops around the Pom Maker and pulled really hard. Then pressed the loop with a finger to tie a knot.
In the video, I used waxed linen thread (used for leather work and jewelry making)
Because of the tension of the yarn, your frosting may pop out as you do this, this is normal. Just make sure you have your thread looped around between the Pom Maker pieces while keeping your frosting on.
Now take out all parts of the Pom Maker and your panda’s ready for a haircut!

You may be happy with your round-faced panda already, but if you want to try trimming it into a more realistic shape, we have a very easy guide.
The first trimming principal is that the nose is the highest point of your panda face. So don’t trim this area at all or at least leave it untouched until the last minute when you can trim a little bit to refine it.
The second trimming principal is that the eye area needs to be trimmed low and you can cut a big chunk of yarn off this area to start with.
Then you can trim the top and side of the head into a shape resembling a trapezoid, narrowing towards the top and becoming a little flat.
Once you form this basic face shape, you can carry on trimming all over to refine your panda.

STEP 6 - Ears
Trim the ears into a shape you like.
Additionally, you can use a felting needle to bond the yarn together to keep the ears in a fixed solid looking shape. Push the felting needle through several yarns from the side.
Do this slowly and watch your fingers! The felting needle is really sharp and I can tell you from experience it hurts if you’re not careful… Wear a thimble if you have one.
The rest is just continuing to refine your panda until you’re happy with it!
Trim yarns that stick out with small scissors – especially the boundaries of the eyes and nose to create neat facial features. Again, you can use your felting needle to push through the yarns between different colors around the eyes and nose to give it better definition and keep the yarn in place.
Your panda will look different from the video even if you followed it exactly, in fact, they’ll look different every time and that’s the fun of it!
Don’t worry too much about yarn counts or the exact shape. Experiment and hope you have lots of fun making!
Original article and pictures take www.diycraftsy.com site
Комментариев нет:
Отправить комментарий